Automated Wig

A place for unofficial tutorials posted by MH users

Moderator: joepal

Automated Wig

Postby brkurt » Wed Nov 04, 2015 11:12 pm

Since a lot of people are clamoring for new hairstyles, I thought I would do a tutorial on a wig template, and update it so that everyone can use it.
The basic approach is to create a thin planar mesh as the basic strand, and use a Makehuman scalp as the emitter.

Here is my goal: to recreate Brigitte Bardot's hairstyle in "And God Created Woman". I'm using classic film, as it is in the public domain.

Image

Image

The next step is to 'Make All Duplicates Real', join the 'strand' objects, and then cut the mesh in half, so that a Mirror Modifier can be used for the styling process.

Image

It's ready for mesh modeling. Try it yourself: http://www.geekopolis.ca/blender/automatedWig1_264a.blend
brkurt
 
Posts: 1100
Joined: Sun Feb 17, 2008 8:49 pm

Re: Automated Wig

Postby brkurt » Fri Nov 06, 2015 4:26 pm

Many of you are probably thinking "Why go to all this trouble, when you can just use hair particles in Blender 2.7x?".
That is the right solution if you are going to finish your model in Blender. But--as many others have found--one needs another program for clothing design. The best one I have found is Marvelous Designer http://www.marvelousdesigner.com.

A better--more global--solution is to make sure that the model can be exported/imported through open Collada. Hair particles and curves are out; only meshes and armatures.

Be that as it may, here is another solution using Bezier curves and Dupliverts. This one is actually quite good for formal 'swept-up' hairstyles:

Image

I like the idea that hair should work as sculpture before detailed texture maps are added. Here is the same mesh, with a simple deform modifier controlled by an empty, and then texture mapped using Inkscape. The graphic is 2048 x 2048 and I used a 1 pixel line, grouped. Heading in the right direction. :)

Image
brkurt
 
Posts: 1100
Joined: Sun Feb 17, 2008 8:49 pm

Re: Automated Wig

Postby brkurt » Sat Nov 07, 2015 5:57 pm

Okay, here is something everyone can work with. It is a full strand wig, with 36000 polygons. It is designed to be styled by you, not me.

Image

and the model:

http://www.geekopolis.ca/blender/stylingTemplate1_264a.blend
brkurt
 
Posts: 1100
Joined: Sun Feb 17, 2008 8:49 pm

Re: Automated Wig

Postby brkurt » Sun Nov 08, 2015 8:47 pm

Okay, third time's the charm for this one. Here is a much simpler solution, using only a single curve, a scalp mesh, dupliverts and a simple deform modifier. I've added an empty for those who want to fool around with this one.

When you are ready to 'comb' the hair, you will need to issue the command 'Make Dupliverts Real'.

Here is the file: http://www.geekopolis.ca/blender/automatedWig3_264a.blend

Image

And here is a quick result, with simple weight painting, smoothing, and some planar rotations around the temple. I would suggest separating the strands into twelve groups, as some machines will choke on this much data.

For the '3d anime' I do, this is nearly finished; the bottom line is that any hair style can be built from this approach, and they will all make it through the open Collada export, which Blender particle hair will not do. ;)

Image
brkurt
 
Posts: 1100
Joined: Sun Feb 17, 2008 8:49 pm

Re: Automated Wig

Postby Shaba1 » Tue Nov 10, 2015 9:16 pm

i noticed that the screen shot in this tutorial used blender 2.4. That is a really old version. Blender and the particle system have gone through several upgrades since then. Secondly there is a very good addon for blender that allows one to make a hair MESH from blender's particle hair. WITH UV MAPPING. Unfortunately it cost $USD10 which is cheap but too much for me right now. Here is a link to the original thread on blenderartist.org

http://blenderartists.org/forum/showthread.php?383004-Addon-generate-mesh-from-hair(with-UVs)&highlight=generate+mesh+from+hair

And here is the link if you want to actually buy the addon
https://sellfy.com/p/XFbE/
Shaba1
 
Posts: 164
Joined: Wed Mar 05, 2008 3:21 pm

Re: Automated Wig

Postby brkurt » Wed Nov 11, 2015 2:49 am

Shaba1 wrote:i noticed that the screen shot in this tutorial used blender 2.4. That is a really old version. Blender and the particle system have gone through several upgrades since then. Secondly there is a very good addon for blender that allows one to make a hair MESH from blender's particle hair. WITH UV MAPPING. Unfortunately it cost $USD10 which is cheap but too much for me right now. Here is a link to the original thread on blenderartist.org

http://blenderartists.org/forum/showthread.php?383004-Addon-generate-mesh-from-hair(with-UVs)&highlight=generate+mesh+from+hair

And here is the link if you want to actually buy the addon
https://sellfy.com/p/XFbE/


Good points all. I use 2.4 because I have a render farm with four Intel dual-core work stations and four Xeon quad-core rack servers set up for it; my primary purpose is to finally finish my graphic novel trilogy http://nuegua.geekopolis.ca. Also because Yafaray is very well-suited to Blender 2.4, and fast! :)

My solution is to create a simple duplivert | deform modifier stack solution that will work for every possible hairstyle.

The core problem remains the same, however. Although I have four other workstations running Blender 2.6x and Blender 2.7x--the only trustworthy import/export at the present for Makehuman | Blender | Marvelous Designer is Open Collada. I"m not focussing on Blender as my endpoint solution; it's just part of the workflow. :geek:

You will note that I post in Blender 2.64a, which should make most folks happy.
brkurt
 
Posts: 1100
Joined: Sun Feb 17, 2008 8:49 pm

Re: Automated Wig

Postby brkurt » Wed Nov 18, 2015 11:14 pm

Here is the result of 20 minute's worth of work:

Image

The basic drill is:
(1) create a Curve object, and orient it up and facing you;
(2) using a scalp template, create a Duplivert object, moving and rotating your Curve until it has the look you want;
(3) convert the Curve to a Mesh, and UV map (very easy), map it to a hair texture that you like (as a single strand);
(4) Apply 'Make Duplicates Real.

You will have a complete wig with realistic-looking hair that can be styled any way you like using the Blender mesh tool set.

In the above picture, I have kept all the objects separate, merely creating a wig Group. This allows me to control the texture map more effectively, since I only have to apply it to the first strand I create.

Here's how it looks using a 4-pass render in Yafaray:

Image

And now a few simple (really!) improvements: extrude the hair strand for two more equal faces, rotate along the y-axis, and then along the x-axis for an upward twist; a Simple Deform Taper with a factor of .5; Subdivision Subsurf. Voila! ( Note: The taper also solves the problem of too much bare scalp between the strands.) Some of you might realize that this is the way to create feathers!

Try it yourself: http://www.geekopolis.ca/blender/inner_seamstress/ellie3_264a.blend

Image
brkurt
 
Posts: 1100
Joined: Sun Feb 17, 2008 8:49 pm

Re: Automated Wig

Postby brkurt » Fri Nov 27, 2015 8:20 pm

Here's a much simpler example, that would work fine for anime.

It is created from two 14-vertex circles parented and dupliverted to a curve (then converted to a mesh object, and UV-mapped).
This solves the problem of finely-detailed hair, and long strands. I then joined these objects, removed the circles, and weight-painted the meshes as a Softbody. To animate this one would need a custom rig.

The final touch would be to use an alpha channel graphic for the hair texture, to get the feathered effect at the end of a hair strand. Normally I do that in Inkscape.

Image
brkurt
 
Posts: 1100
Joined: Sun Feb 17, 2008 8:49 pm

Re: Automated Wig

Postby brkurt » Sat Nov 28, 2015 8:51 pm

Here's another variation, that starts with a much smaller 'skull cap' and then moves the strands around. This one is hard-core anime, no apologies:

Image
brkurt
 
Posts: 1100
Joined: Sun Feb 17, 2008 8:49 pm

Re: Automated Wig

Postby brkurt » Mon Nov 30, 2015 4:15 pm

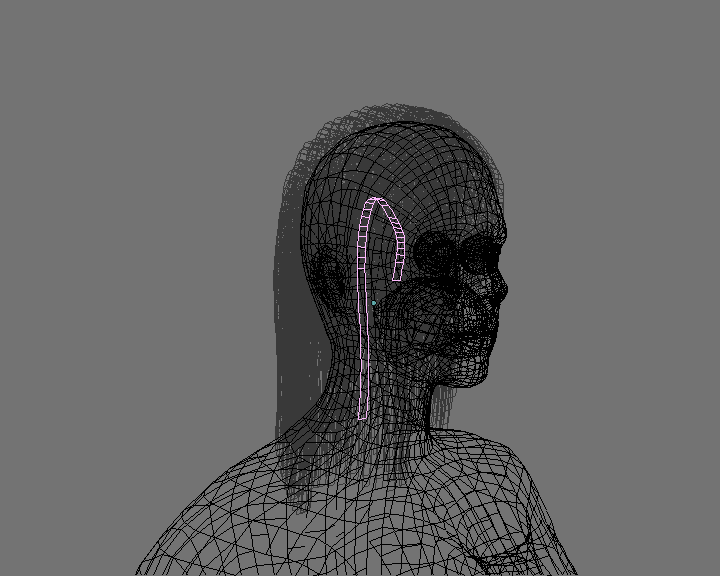
The choice and location of the curve object is important. Here I have subdivided the curve, and added a hook at the front, then converted it to a mesh.
I then rotated it until the 'crown' of hair around the face are all surfaces facing toward the camera.

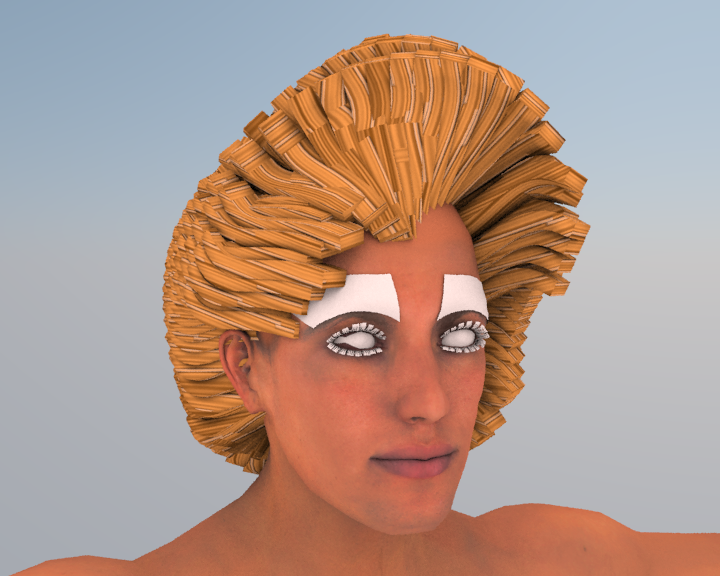
This particular design has two drawbacks, one easy to fix, and one hard-to-fix. The first is that there are far too many strands!
That's fixed by simply deleting 'every other row' of vertices. The second problem is that the strands interpenetrate one another.
This is fixed by creating vertex groups for each row, and rotating the entire row of strands. This will clear most of the problem,
but since a skull is not a perfect circle, some strands have to be separated manually.

The screenshot:

Image

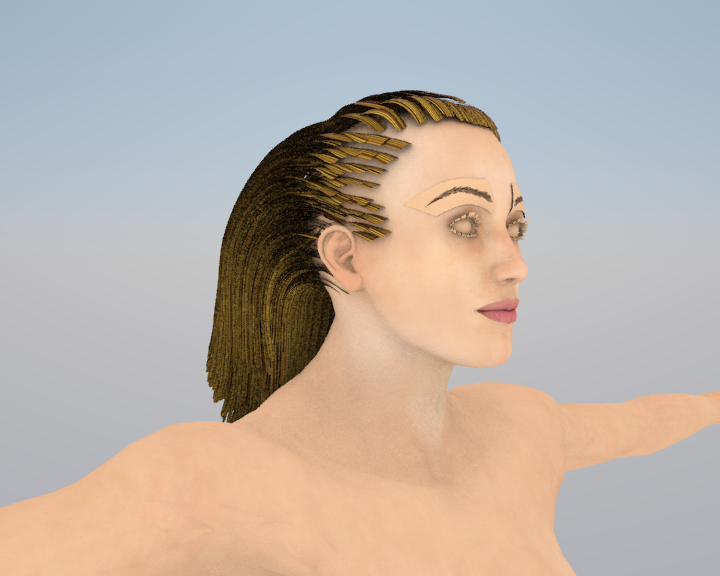
The result looks like this in Yafaray:

Image

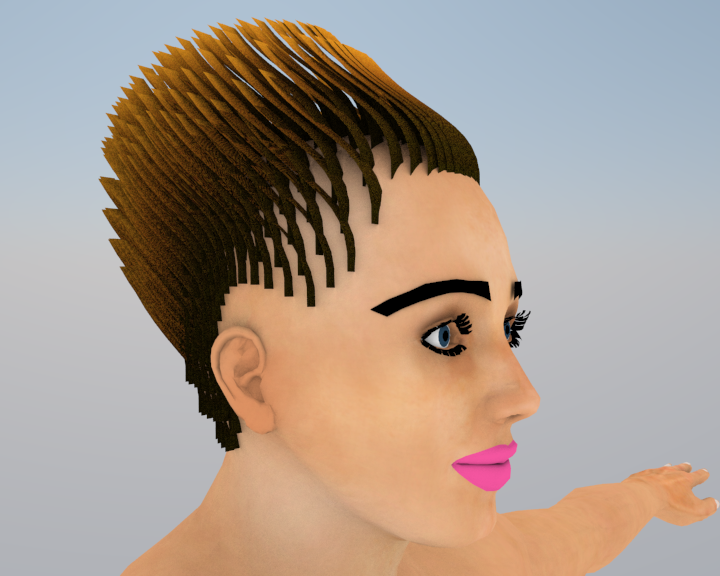
Here is a better version, with only seven vertex rows, and the curve object widened (by two) along the x-axis. The issue now is to decide how to group the strands, so that you can work with several at a time. At this point, the work is meticulous, but not particularly difficult.

This one is ready for the community. Note that I am using the MH base mesh, so you can upload your results through MakeClothes.

http://www.geekopolis.ca/blender/inner_seamstress/curveWig1_264a.blend

Image
brkurt
 
Posts: 1100
Joined: Sun Feb 17, 2008 8:49 pm

Next

Return to Tutorials

Who is online

Users browsing this forum: No registered users and 1 guest

cron